Monday, September 29, 2014

DIY: Polka Dot Wooden Photo Mounts

I'm always looking for fun, creative ways to get my photos displayed around the house.  Today, I'm sharing a crafty tutorial making wooden photo mounts, perfect for 4x4 Instagram photos.

First, you'll need some supplies: wooden craft boards, a couple shades of acrylic paint, some ribbon, a brush, circle stamp (I first tried using a cork, but it didn't work very well, so I ended up using a rubber stamp) and stapler.


1. Using your foam brush, apply a light coat of acrylic paint to the wooden board.  1.  I used a very light coat so that I could still see the wood grain and some wood peeking through.  If you prefer, coat it heavily for a totally different look.  3.  I like to work in mass production, so I made 6 at once.  4. Apply a small dab of the second shade of paint to your foam brush.  5.  Using the brush as a stamp pad, press your stamp into the paint, and apply to the board.   6.  Be sure to stamp some off the edge for a less perfect look.

To finish the boards, I added a little bit of paint to the edges and outlined the front as well.  It sort of completed the look for me.

Next, cut your ribbon just by eyeballing the length you'd like to hang them at.  Finally, when they are dry, flip over and staple them to the back.  The wood is very soft, so it's easy to staple though with a nice, swift hit.

There you have it.  Cute little photo mounts perfect for displaying those phone photos.


Friday, September 5, 2014

devil's backbone open space hike [loveland]


By far, my favorite thing about moving back to Colorado has been enjoying the great outdoors.  It's like food for the soul.  The kids don't just LOVE hiking, but every time we go, they always come back refreshed and happier than when we left.  There is something about being in nature with all of her colors and textures, sounds and smells that both relaxes and stimulates the senses.  We've sort of made a commitment that as long as we live in this awesome state, hiking and outdoor adventures will be part of our lifestyle.

Devil's Backbone open space was a great, shorter 2 mile trail for us, though there are lots of longer options too, if you want to go further.  We took Kelly Pepper on her first hike here (sorry, no photos of her--she was too busy enjoying the trail!) and didn't want to go very far from home.


The kids had a great time on this hike.  We will definitely be going back.
If you're interested, you can check out some of our other family hikes below.


Thursday, September 4, 2014

homemade salsa


We've had an amazing crop of tomatoes this year.  Actually, it's our first crop of tomatoes ever.  Last year, we inherited a garden with our house, but everything was pummeled to pieces in a late season hail storm.  This year, we planted our first garden ever and have been enjoying it all summer.

I've had so many tomatoes that I needed to do something to preserve them all.  I've never canned a thing, but my mom used to, so I thought I'd give it a try.  After searching the Internet for tips, I discovered someone who said she froze her jars.  Since we have a deep freezer that has lots of spare room, I thought I'd give it a try.

To start, I gathered a ton of tomatoes, about 6 pounds.

My little helper and I added cilantro, garlic, onions and jalapeno peppers.

I almost forgot the limes.  Here is my ingredient list.

I chopped up everything in the food processor and added the juice of three limes and about 1/2 tablespoon salt.  

I filled my mason jars with about an inch to spare, let them sit overnight so that the flavors could meld and put them in the freezer the next morning.

There you have it!  Yummy homemade salsa to last us through the winter.


Monday, September 1, 2014

DIY: wire photo holders [camera shaped]


It's another DIY crafty Monday post.  Today, I'm making simple photo holders from 28-gauge wire.  I'm always looking for simple and clever ways to display photos around the house.  What could be more fun than wire-twisted photo holders that look like little cameras?

Start by gathering your supplies:  wire pliers, 28-gauge wire and some of your favorite photos.

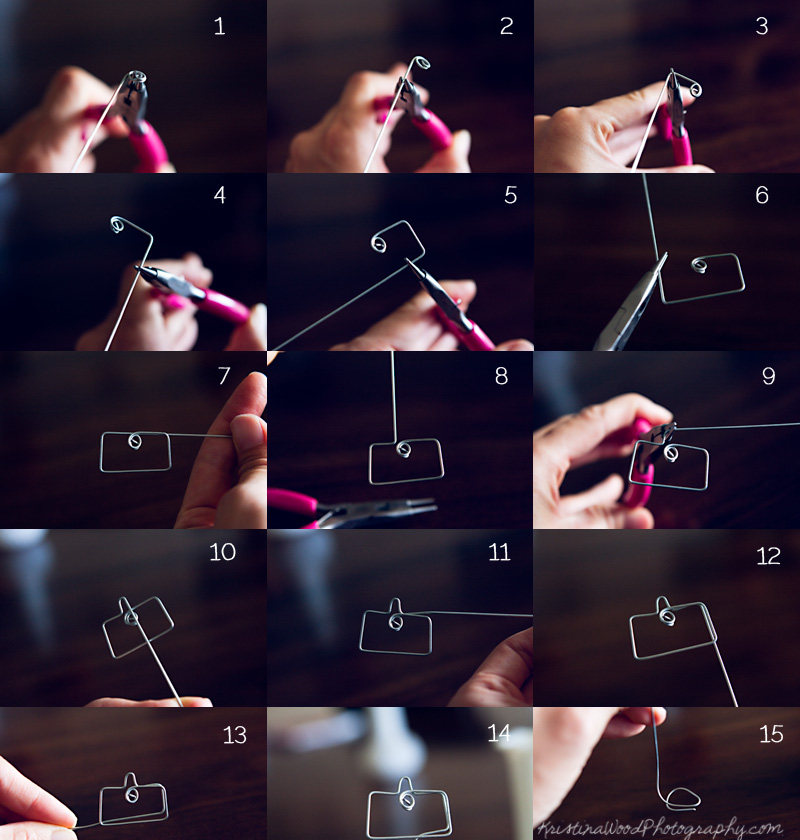
Now comes the fun part.  1. Start by twisting the wire into a tight little spiral.  This will be the "lens" of the camera.  2. Grab the wire about 1/2" away from the spiral. 3. Bend to a 90 degree angle.
4. Estimate another 1/4" or so and bend the wire to another 90 degree angle.  Repeat this for steps 5, 6 & 7.  To make the "flash", bend the wire directly above the "lens" following steps 8-11.  To finish off, bend the wire along the same angles until you get to the bottom of the camera and bend straight down following steps 12-14.  15. Finally, twist the other end of the wire into a slight circle to stabilize the bottom.

Place your camera-shaped wire into your favorite vase and insert photo.

You could also leave off the "flash" part to make a square, Instagram looking camera.  

Fill your vase with a few more twisted wires.  Vary the height by bending some wires shorter than others.

Fill with photos for a fun photo display!

I'll be sharing a few more crafty tutorials over the next few Mondays, so be sure to stop by again. :)